Hey there! I’m a supplier of Stone Aluminum Honeycomb Panels, and I’m stoked to share some tips on how to install these bad boys on a glass curtain wall. Whether you’re a DIY enthusiast or a professional contractor, this guide will walk you through the process step by step. Stone Aluminum Honeycomb Panel
Why Choose Stone Aluminum Honeycomb Panels?
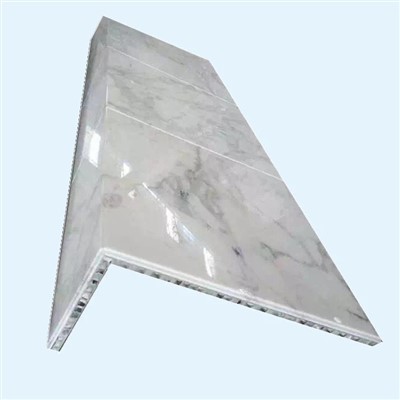
Before we dive into the installation process, let’s talk about why Stone Aluminum Honeycomb Panels are a great choice for your glass curtain wall project. These panels are a combination of natural stone veneer and an aluminum honeycomb core, which makes them lightweight, strong, and durable. They also offer excellent insulation properties, which can help reduce energy costs and improve the overall comfort of your building.
Another advantage of Stone Aluminum Honeycomb Panels is their aesthetic appeal. The natural stone veneer gives the panels a luxurious and elegant look that can enhance the appearance of any building. Plus, they come in a variety of colors and finishes, so you can choose the one that best suits your design style.
Tools and Materials You’ll Need
Before you start installing the Stone Aluminum Honeycomb Panels, you’ll need to gather the following tools and materials:
- Measuring tape: To measure the dimensions of the glass curtain wall and the panels.
- Level: To ensure that the panels are installed straight and level.
- Drill: To drill holes in the glass curtain wall and the panels.
- Screwdriver: To attach the panels to the glass curtain wall.
- Adhesive: To bond the panels to the glass curtain wall.
- Sealant: To seal the joints between the panels and the glass curtain wall.
- Safety equipment: Such as gloves, goggles, and a hard hat, to protect yourself during the installation process.
Step-by-Step Installation Guide
Step 1: Prepare the Glass Curtain Wall
The first step in installing Stone Aluminum Honeycomb Panels on a glass curtain wall is to prepare the surface. Start by cleaning the glass curtain wall thoroughly to remove any dirt, dust, or debris. You can use a mild detergent and water to clean the surface, and then dry it with a clean cloth.
Next, measure the dimensions of the glass curtain wall and the panels to determine the number of panels you’ll need. Make sure to leave a small gap between the panels to allow for expansion and contraction.
Step 2: Mark the Placement of the Panels
Once you’ve measured the dimensions of the glass curtain wall and the panels, use a measuring tape and a level to mark the placement of the panels on the glass curtain wall. Make sure to mark the centers of the panels and the edges of the joints.
Step 3: Drill Holes in the Glass Curtain Wall
Using a drill, drill holes in the glass curtain wall at the marked locations. Make sure to use a drill bit that is the same size as the screws you’ll be using to attach the panels.
Step 4: Apply Adhesive to the Panels
Apply a thin layer of adhesive to the back of each Stone Aluminum Honeycomb Panel. Make sure to spread the adhesive evenly over the entire surface of the panel.
Step 5: Attach the Panels to the Glass Curtain Wall
Carefully place each panel on the glass curtain wall at the marked locations. Press the panel firmly against the wall to ensure that the adhesive bonds properly.
Next, insert screws through the holes in the panel and into the holes in the glass curtain wall. Tighten the screws securely to hold the panel in place.
Step 6: Seal the Joints between the Panels
Once all the panels are installed, use a sealant to seal the joints between the panels and the glass curtain wall. Make sure to apply the sealant evenly and smoothly to prevent water and air from leaking through the joints.
Step 7: Clean Up
After the installation is complete, clean up any excess adhesive or sealant from the surface of the panels and the glass curtain wall. You can use a clean cloth and a mild detergent to clean the surface.
Tips and Tricks
- Use a template: To ensure that the panels are installed evenly and precisely, you can use a template to mark the placement of the holes in the glass curtain wall.
- Work in sections: If you’re installing a large number of panels, it’s a good idea to work in sections to make the installation process more manageable.
- Allow the adhesive to dry: Make sure to allow the adhesive to dry completely before applying the sealant or putting any pressure on the panels.
- Follow the manufacturer’s instructions: Always follow the manufacturer’s instructions for installing the Stone Aluminum Honeycomb Panels and using the adhesive and sealant.
Conclusion

Installing Stone Aluminum Honeycomb Panels on a glass curtain wall is a relatively simple process that can be completed by anyone with basic DIY skills. By following the steps outlined in this guide and using the right tools and materials, you can achieve a professional-looking installation that will enhance the appearance and functionality of your building.
Aluminum Honeycomb Panel If you’re interested in purchasing Stone Aluminum Honeycomb Panels for your next project, please don’t hesitate to contact me. I’d be happy to discuss your options and provide you with a quote.
References
- Manufacturer’s installation instructions for Stone Aluminum Honeycomb Panels
- Building codes and regulations for glass curtain wall installations
- Industry best practices for installing exterior cladding materials
Kangbeier Technology Innovation (Shandong) Co., Ltd.
Kangbeier Technology Innovation (Shandong) Co., Ltd. is one of the most professional stone aluminum honeycomb panel manufacturers and suppliers in China, specialized in providing high quality customized service. Be free to wholesale discount stone aluminum honeycomb panel made in China here from our factory. For price consultation, contact us.
Address: LinYi High-tech District, LinYi City, Shandong Province, China
E-mail: shawn@kbepanel.com
WebSite: https://www.kbehoneycomb.com/